Bike Brake Pads: When to Replace Them, and Which Ones Fit
Pads are the cheapest safety part on the bike and the one nobody checks. Here is how to tell they are done, and how to buy the right shape the first time.
How this is funded: we earn a commission if you buy through our links, at no extra cost to you. It never changes which bike we recommend, and we will tell you plainly when we would skip one. Full disclosure.
Brake pads are the cheapest safety-critical part on a bicycle. A set costs less than a takeaway, takes about fifteen minutes to fit, and is the only component on the bike that is designed to wear away to nothing.
They are also the part nobody checks, because a worn pad does not announce itself. Braking gets slightly worse every week, you adapt to it without noticing, and the first real signal arrives on a wet descent when you need the brake to do something it can no longer do.
The thing that catches everyone out
A brake pad fits a caliper, not a bike. There is no such thing as “brake pads for a road bike”. If you search that, you will be shown a dozen shapes that fit a dozen different calipers, and roughly eleven of them will not fit yours.
The first split is the obvious one. Rim brakes squeeze a block against the side of the wheel; disc brakes squeeze a small pad against a metal rotor at the hub. These are unrelated parts that share a name. On this site the Tommaso Imola and Monza brake on the rim, and the Sentiero and Sterrata use discs, so two bikes from the same brand take completely different parts.
The second split is the one that actually costs people money, and it is inside the disc category. Shimano use one pad family for their mountain-bike-derived calipers — B01S and its relatives, which is what most budget disc bikes are built around — and a different family entirely, the L series, for the flat-mount road and gravel calipers on groupsets like GRX and 105. Both are “Shimano disc pads”. Neither fits the other.
When rim pads are done
Park Tool group rim pads into three systems — road, threaded stud and smooth stud — and note that with use, pads simply lose material until they are too thin to be effective.
There are three signals, in the order you will notice them:
- The wear grooves have gone. Most rim pads have shallow grooves molded into the braking surface. They exist as a wear gauge and nothing else. When you can no longer see them, the pad is finished.
- The pad has hardened. Park Tool make the point explicitly: pad material hardens as it ages as well as wearing thin. A shiny, glazed pad with plenty of material left can still stop badly, and old stock that has sat in a shed for five years is worth replacing on age alone.
- There is grit embedded in the surface. Look closely. Small bright specks are aluminum filings and grit that have been pressed into the rubber, and they will machine the braking surface off your rim. That is a wheel, not a pad, so this one is worth catching early.
When disc pads are done
Disc pads get an actual published number, which is a relief. Park Tool’s stated threshold is that the pad material should measure at least 1mm thick. Below that, replace them.
That 1mm is the friction material only — the gritty layer — not the metal backing plate it is bonded to. New pads carry somewhere around 3mm to 4mm of material depending on the shape, so 1mm is close to the end rather than a comfortable margin.
Look into the caliper from above with the wheel in place, or take the wheel out and look straight through it. If you cannot tell, pull the pads: on most calipers that is one retaining pin or bolt and thirty seconds of work.
One thing to check while they are out: if the two pads have worn unevenly, the caliper is not centered. Fix that first — the brake adjustment guide covers centering — or the new pads will wear exactly the same way.
Compounds, in plain English
Disc pads: resin, semi-metallic, metallic
Park Tool publish a straight comparison of the three, and it is refreshingly free of marketing:
- Organic (resin). Best initial bite, and best for rotor longevity. Poorest durability in the wet.
- Semi-metallic. Middle ground on every measure.
- Metallic (sintered). Longest pad life in the dry. Generates more brake noise.
For a first bike ridden on roads and dry gravel, resin is the sensible default: it bites well from cold, it is quiet, and it is kind to the rotor. Move to semi-metallic if you commute through winter or live somewhere with long descents, where the wet durability matters more than the silence.
Park Tool also warn that there can be compatibility issues between certain rotor materials and pad materials — some rotors are marked resin-only. If yours has writing on it, read it before you buy metallic pads.
Rim pads: it is mostly about rain
Kool Stop publish descriptions of every compound they sell, which makes them one of the few places you can get a straight answer. Their salmon compound is described as an aggressive compound for extreme all-weather conditions, especially in the wet, but still superb in the dry. Their black is the standard compound, great in all weather but designed for dry-condition riding.
That is the whole decision. Wet-weather rim braking is genuinely poor — it is the main honest argument for buying discs instead — and a softer all-weather compound is the cheapest way to claw some of it back on a bike you already own. The trade is wear rate: softer pads in worse weather do not last as long.
The one hard rule: aluminum rims and carbon rims take different pads. A pad meant for an alloy braking surface will destroy a carbon one. Every bike we recommend has alloy rims, so this is unlikely to bite you here, but it is worth knowing before you buy a wheel upgrade.
If you already know the pads are finished and you are here for the shopping decision instead, the brake pad roundup lays the same four pads out as a buying page — disc or rim first, then compound, with the published fitment for each.
Pads worth buying, by what your bike actually has
Two rim options and two disc options - because these four cover the brakes on every bike this site recommends. Check the shape against the pad you are removing before you order any of them.
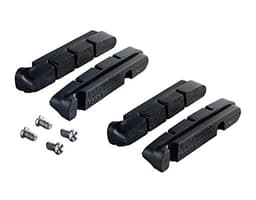
Shimano R55C4 Rim Brake Pads (2 pairs, with bolts)
The like-for-like replacement if your rim-brake bike came with Shimano calipers. Two pairs and the bolts, which is both wheels done in one order.
$18.94 · View on AmazonPrice as of October 21, 2026. #ad How we’re funded
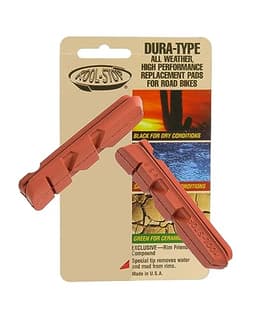
Kool Stop Salmon Brake Pad Inserts (Dura-Ace/Ultegra)
The cheapest worthwhile upgrade here. Same holders, better compound in the rain - Kool Stop publish salmon as their all-weather option rather than leaving you to guess.
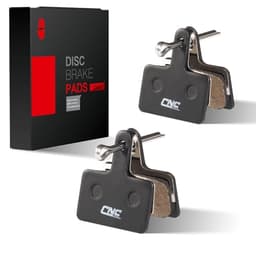
Eastern Power B01S/B03S/B05S Resin Disc Brake Pads
The quiet default for a budget disc bike, and one of the few listings that publishes the pad's actual dimensions so you can measure before you buy.
$9.88 · View on AmazonPrice as of October 21, 2026. #ad How we’re funded
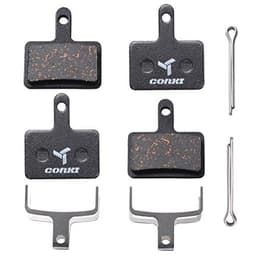
Corki Cycles Semi-Metallic Disc Brake Pads (2 pairs)
The wet-weather and long-descent answer in the same B01S shape. Noisier than resin, which is the price of the durability.
$11.99 · View on AmazonPrice as of October 21, 2026. #ad How we’re funded
We have not ridden or tested these — every specification comes from the manufacturer or the retailer listing, dated. Here is exactly what we do instead.
How to work out which pad you need
Three steps, in this order, and do not skip the first one:
- Take the old pad out and look at it. This is the only reliable method. Most pads have a part number stamped or molded into the backing plate. If yours does, that number is your answer and you can stop here.
- If there is no number, measure it. Length, width and thickness of the backing plate. Good listings publish these — the resin pads above state 30.5 x 35 x 4mm — and matching three numbers is far more reliable than matching a photograph.
- Check the caliper name against the listing. Sellers of multi-fit pads list the calipers they are cut for. Your caliper usually has its model printed on it. If your caliper is not on the list, believe the list.
If the bike is still boxed or newly built, the manual has the pad specification in it. That is the easy version of all of the above, and it is the one moment in the bike’s life when the answer is written down — worth noting while assembling it.
What the job actually involves
Rim brakes
Take the wheel out to get it out of the way, undo the pad’s mounting nut and note the order the spacers came off in. Park Tool give two rules worth committing to memory: if the holder has a closed end and an open end, the closed end always faces forward — otherwise braking pushes the insert straight out of the holder — and the caliper arm should sit close to vertical as the pad meets the rim.
Check for a directional arrow on the new pads before fitting, and make sure the pad strikes the braking surface squarely rather than fouling the tire or hanging below the rim.
Disc brakes
Wheel out, then release the retaining pin or bolt and slide the old pads out with the spring. On hydraulic calipers the pistons need pushing back into the caliper body before the thicker new pads will go in — a tire lever or a cone wrench does it if you do not own the purpose-built spreader.
Fit the new pads and spring the same way round the old ones came out, refit the pin, and — this is the step people forget — pump the lever several times before riding to move the pistons back to the working position. The first pull after a pad change goes straight to the bar, which is alarming if you are already rolling.
Squealing is usually not a wear problem
New pads that squeal are more often contaminated than worn. Park Tool describe the test plainly: look for a darkness on the rotor and pads that smears when rubbed with a finger. Squealing, reduced power and that smear together mean contamination.
The usual culprits are aerosol lubricant overspray and hydraulic leaks. Both matter because the source has to be found — fitting fresh pads to a leaking caliper or spraying chain lube near a rotor again just ruins the new set too.
On rim brakes, squeal is more often geometry than contamination, and it is an adjustment rather than a purchase.
The habit worth building
Look at the pads whenever you pump the tires. The wheel is already in your hands and the pads are right there, so it costs you nothing and it is the only way this ever gets checked.
Keeping a spare set in the toolbox is the other half of it. Pads are small, cheap and do not expire in any practical sense, and the alternative is discovering the problem on a Sunday with the shops shut.
Questions people actually ask
How do I know when my bike brake pads need replacing?
On disc brakes, measure the friction material: Park Tool's published threshold is that it should be at least 1mm thick, and below that the pad is done. On rim brakes there is no single published number, so you go by the wear grooves molded into the pad - when the grooves have disappeared, so has the pad. Park Tool also note that rim pad material hardens with age, so a pad that still looks thick but stops badly can be finished too.
How long do bike brake pads last?
There is no honest mileage figure and anyone quoting one is guessing. Pad life depends on rain, grit, how much you descend, your weight and the compound. A dry-weather road rider can get a couple of seasons out of a set of rim pads; the same pads on a wet winter commute can be gone in a few months. This is why the answer is to look at them, not to count miles.
Are all bike brake pads the same?
No, and this is the mistake that costs people money. A pad fits a caliper, not a bike, so 'brake pads for a road bike' is not a thing you can order. Rim pads and disc pads are unrelated parts. Within disc pads there are dozens of shapes, and Shimano alone uses one family for their mountain-bike calipers (B01S and relatives) and a different one for road and gravel flat-mount calipers (the L series). Take the old pad out and match it before you order.
What is the difference between resin and metallic disc brake pads?
It is the trade-off between quiet and durable. Park Tool's published comparison rates organic (resin) pads best for initial bite and best for rotor longevity, but worst for durability in the wet. Metallic pads last longest in dry conditions but generate more noise. Semi-metallic sits in the middle of both, which is why it suits riders who get caught in weather but do not want a permanently noisy bike.
Why do my brakes squeal after new pads?
Usually contamination rather than wear. Park Tool describe the test: look for a darkness on the rotor and pads that smears when you rub it with a finger. Chain lube overspray and hydraulic fluid leaks are the common causes, and the source has to be found or the new pads will be ruined too. On rim brakes, squeal is more often a toe-in problem, which is an adjustment rather than a part.
Can I replace brake pads myself?
On both rim and disc brakes, yes - it is one of the genuinely beginner-friendly jobs, needing a hex key and sometimes a pair of pliers. The parts that are not beginner-friendly are hydraulic bleeding and a bent rotor, and neither is part of a pad change. If you have swapped the pads and the brake still does not feel right, that is the point to hand it to a shop.
Sources
Specifications come from the manufacturer or the retailer listing, dated. Where a figure is not published, we say so rather than estimating it.
- Park Tool — Disc brake pad removal and installation — The published replacement threshold - pad material should measure at least 1 mm thick - plus the compound comparison: organic gives the best initial bite and the best rotor longevity but the poorest wet durability, semi-metallic sits in the middle, and metallic lasts longest in the dry while generating more noise. Also the contamination test: a darkness on the rotor and pads that smears when rubbed with a finger (accessed September 5, 2026)
- Park Tool — Brake pad replacement, rim brakes — The three rim brake pad systems (road, threaded stud, smooth stud), the rule that a holder's closed side always faces forward, the guidance that the caliper arm should be close to vertical as the pad strikes the rim, and the point that pad material hardens with age as well as wearing thin (accessed September 5, 2026)
- Kool Stop — Brake pad compound descriptions — The manufacturer's own definitions of every compound they sell. Salmon is described as an aggressive compound for extreme all-weather conditions, especially in the wet, but still superb in the dry; black is the standard compound designed for dry-condition riding; dual is a fusion of black and salmon (accessed September 5, 2026)
- Park Tool — Dual pivot brake service — Rim-brake centering, pad clearance and the 6-7 Nm mounting torque, from the tool manufacturer (accessed August 11, 2026)
- Park Tool — Mechanical disc brake alignment — Caliper alignment and pad adjustment procedure for cable-actuated disc brakes (accessed August 11, 2026)
Read next
How to Adjust Bike Brakes
The rubbing, the soft lever and the squeal - fixed before you buy parts.
Read the guideBest Bike Tool Kits
The hex keys and torque wrench this job needs, with live prices.
See the tool picksDisc Brakes vs Rim Brakes
Which system you are buying into, and what each costs to keep running.
Read the comparisonBike Maintenance for Beginners
Where the pad check sits in the wider routine.
Read the guide